Condenser Coil Maintenance
Refrigerated containers provide extremely reliable and economical solutions for your cold storage needs. What most people don’t realize is that the condenser coil needs maintenance. However, with a little regular maintenance and care, they will provide you with years of service.
Here are a few condenser coil maintenance items and reminders to assure reliable service from your Refrigerated Container.
- Keep the condenser coil clean. With any refrigeration system, keeping the coil washed out and clean is extremely important to your unit’s operations. Dirty coils can cause many problems with the operation of the unit including premature failure of the compressor. Thus, premature failure can cost thousands of dollars to replace. It is recommended to clean your coil at least 4 times a year. A visual inspection of the coil will tell if it needs to be cleaned more often. Please refer to the instructions below or feel free to contact us with questions on how to clean the coil.
- Repair the unit with OEM parts. Keep the unit in OEM condition and only repair it with factory-replacement parts. This is strongly recommended. If the units are altered and not repaired back to OEM standards, troubleshooting the unit is very difficult. In most cases, we stock replacement parts and can have parts sent to you by the next day of your order.
- Evaporator Coil Icing. Much like most walk-in freezers, from time to time the Evaporator coil will build up with ice which will eventually block the airflow and can cause premature failure of the compressor if left unchecked. This usually occurs with heavy door openings and leaving the doors open for extended periods. If this occurs, it is necessary to remove the product and allow the unit to thoroughly thaw and dry out by running the unit in heat mode and leaving the rear doors open. Also, removing the top rear cover in the evaporator section is recommended, and also assure the drain tube is free and clear and not clogged.
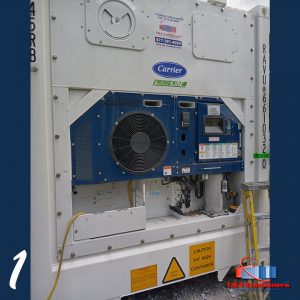
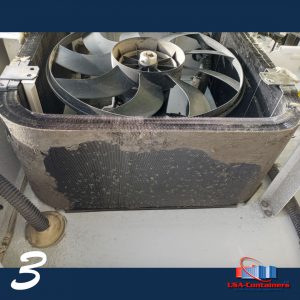
Three example photos below are of the machine’s coil being maintained.


- The first picture above is a standard Carrier unit and what it looks like before cleaning.
- In the second picture above, you can see where the panel has been removed. You can see the dirty coil and a bird’s nest that has found a home!
- Lastly, the third picture above shows a dirty coil up close.
Instructions:
7.10.1 Condenser Coil Cleaning To ensure optimal efficiency of the unit the condenser coil must be clean. The condenser coil should be cleaned at least once a year. More frequent cleaning may be required depending on operating conditions. Clean the coil with fresh water sprayed in the reverse direction of the airflow to remove any debris from the coil. Using mains water pressure is sufficient, high-pressured water is not required. To clean the condenser coil, perform the following procedure:
! WARNING! Do not remove the condenser fan grille before turning the power OFF and disconnecting the power plug.
- Make sure the unit is powered off and the plug is disconnected.
- Remove the condenser fan grille.
- Starting from the top of the coil, use a water hose with a nozzle to wash the coil from the inside out.
- Systematically wash across the inside top face of the coil until the water runs clear. 1 2 3 4 5 6 7–17 T-363
- Wash down the center section, and then through the bottom of the coil, continue washing until the water runs clear.
- After the coil is clean, rinse the condenser fan to remove any dirt build-up from the blades.
- While ensuring that it is centered around the fan, replace the condenser fan grille.
We offer 24/7, 365 Free Support
We do offer 24/7, 365 free technical support at 877-391-4064 for all our refrigerated container sales and rentals. When you call, you will speak to an actual Reefer Technician. If you call after hours and it is an emergency, be sure to press #2 when you get the automated attendant.
